Mrs. Ryan's Class

A Digital Learning Hub for students and parents

A Journey into Acrylic Paint- Post # 6

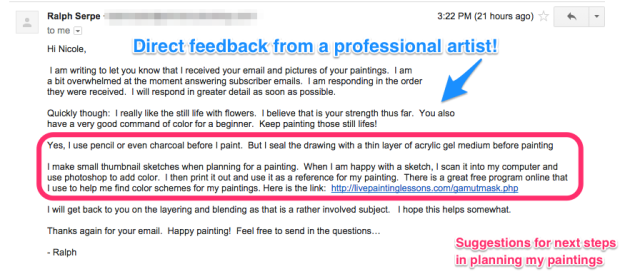
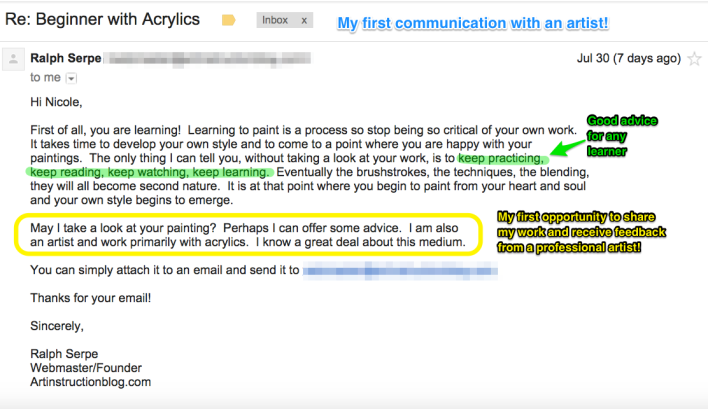
I was finally able to connect with an artist this week! After falling in love with the helpful articles, blog posts, and videos on http://www.artinstructionblog.com/ I reached out to the webmaster of the site for some advice and feedback. Ralph got back to me within the week! He gave me some suggestions for a beginning painter and even offered to review some of my work to give me specific feedback! I was very excited, to say the least.

initial emailinitial response from ralph

new_email

Ralph Feedback

I am so happy to have finally begun to develop this part of my Personal Learning Network where I can personally connect with people who can help me learn. Upon Ralph’s suggestion, I decided to investigate http://livepaintinglessons.com/gamutmask.php. I signed up for two free art videos; “Landscape” and “Still Life” and have already received one in my email! I can’t wait to try these new lessons.

In his reply, Ralph also shared how he plans for painting. He shared that he does a sketch on paper and scans it into Photoshop to add color. Then he prints out his drawing and uses it as a guide to sketch his painting on the canvas. I am not ready to tackle Photoshop just yet, but I decided to modify Ralph’s technique and draw my plan on a paper with similar dimensions to the canvas I wanted to work on.

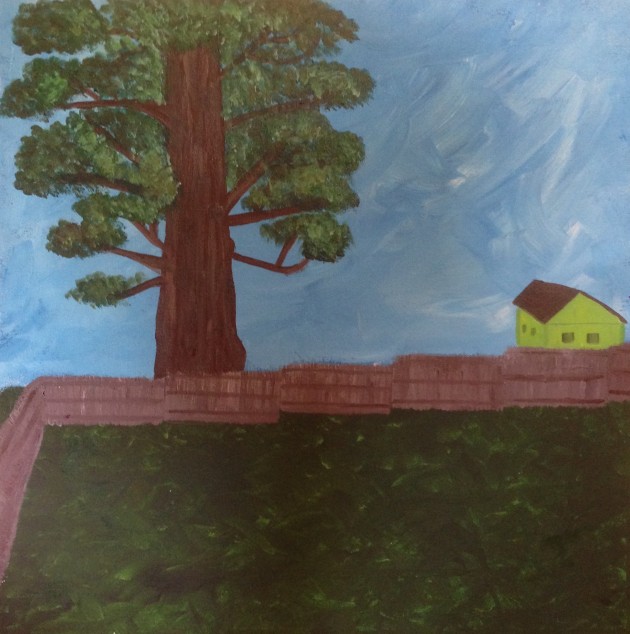
I have been inspired by a huge Pine Tree that grows in the back of my neighbor’s yard, so this week I decided to attempt to capture its beauty.

sketch

I relied on my previous learning from this NLP to create a cross-hatched sky and grass, and used blending techniques that I learned from Glen Farquhar to create the fence. I used my plan to draw the shape of a tree and shed directly onto the canvas.

tree shetch house

Then, I recalled what I learned about using the chisel tip of a flat brush to create the straight lines of the fence, and the curved branches of the tree. I used my learning about the Filbert Brush to create the illusion of leaves, and layered lighter colors over darker ones to create depth and dimension in the leaves of the tree.

tree

My next steps in my NLP will be to follow the lessons from livepaintinglessons.com to learn more about light and shadows in my painting.

2 Comments »

A Journey into Acrylic Painting- Post #5

This week I set out to accomplish one of my Network Learning Project Goals: learn how to blend and layer colors, add texture, and fix mistakes. I found an incredible resource called Artinstructionblog.com as I worked to develop my Personal Learning Network on painting. I found a blog post that shared this video of Glenn Farquhar teaching viewers to blend acrylic paint by layering wet paint (I shared his video last week in A Journey into Acrylic Painting- Post #4.)

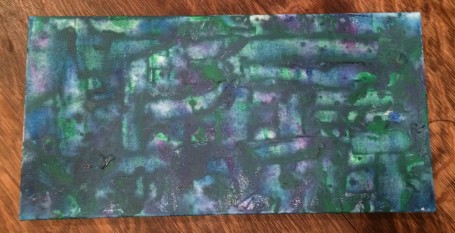
I followed Glenn Farquhar through the entire process and ended up with a piece of artwork that was really fun to create and helped me to understand more about how water can be added to paint to create layers of color, add texture, and blend colors. Please view my TimeLapse video on how I created my abstract work of art!

Here is the finished painting:

learning how to blend and layer color

learning how to blend and layer color

I love how the final product is full of texture, and the layered colors appear so deep. I learned that you need to use paint with varying amounts of water to create a layered, blended look. Each new addition of color to this piece was a different paint to water ratio- each color had a different consistency. When I pulled the colors together using my scraper (cut-up paper plate) the thicker paint spread over the thinner paint and exposed the blended colors beneath. This technique worked incredibly well with an abstract piece, but I think it could be modified when painting a more realistic/natural scene.

After I completed this first piece, I experimented with my new knowledge on another canvas. I used a different base color (blue) and used more water mixed into each additonal color than I had in my first painting. I ended up with a painting that looks more like tie-dye, which further helped me to understand that one of the keys to blending and layering colors to add texture is using paint that has a variety of texture and consistency.

Whoops! Too much water!

Whoops! Too much water!

By the time I post again I hope to have communicated and shared ideas with at least one other artist from my Personal Learning Network.

Stay tuned!

2 Comments »

A Journey into Acrylic Painting- Post #4

This week I set out to further establish my Personal Learning Network (PLN). At first, I hit a bit of a wall when I discovered that many blogs did not fit my needs. I was excited when I found the website artistsnetwork.com – because of the title I assumed that I could add this site to my own network of resources! After some exploration I discovered that much of this website was too advanced for my understanding – the content did feel accessible at this point in my learning. Additionally, some of the blogs that I found linked to this site displayed photographs of beautiful paintings, but did not explain or teach about the technique and process. It seems that the purpose of many art blogs is to share work and network with other established artists, not to teach.

Instead of googling “Acrylic Painting Blogs” I decided to use my Professional Learning Network and explore boards I follow on Pinterest. This opened the doors to a welcomed rabbit hole as I started to find more interesting and relevant boards to follow on Pinterest.

Through my Pinterest exploration, I finally stumbled on a blog called “Art Instruction Blog” filled with tons of links to other blogs. Much to my relief, these blogs are intended to teach people at various levels of proficiency. One of my personal learning goals that I set for this week was to learn more about mixing and blending paint colors. I found a blog post called “How to Easily Create your own Beautiful Abstract Painting Step by Step” that shares a video of another artist, Glenn Farquhar, demonstrating how to blend and layer colors while creating a beautiful piece of abstract art.

Another learning goal that I established for myself this week was to comment on/reach out to artists that I would like to add to my Personal Learning Network. I am proud to say that I have reached out to two artists (including the administrator of Art Instruction Blog and the artist, Glenn Farquhar) and have now started exploring each of their blogs further. Between these blogs and my expanding Pinterest network, I have found countless beginner acrylic tutorials and free lessons online.

For next week, I hope to continue to establish my Professional Learning Network and begin a conversation with artists about their work. I will also combine my new learning about blending and layering color to create a piece of art that is more fluid and polished.

2 Comments »

A Journey into Acrylic Painting- Post #3

The blue and green Comma Strokes that I made with my Filbert Brush earlier in the week really inspired me. These little practice strokes reminded me of tiny peacock feathers, so for the remainder of the week I decided to use my new learning about brushes and brush strokes to paint a peacock feather. I took the lead from some artists I watched on Youtube and chose a photograph to base my work off of. I found this beautiful photo online, and decided to use it to guide me.

peacock-feather-81459_640First, I worked on holding my brush appropriately and only moving my shoulder as I painted. This new learning really helped me! I realized that prior to this week, I consistently used my wrist to create small brush strokes because I thought it would give me more control. Now that I learned to steady my hand with my pinky and move my entire arm, my lines are more controlled.

I started this painting by creating a yellow and white cross-hatch background. I love the depth that this technique creates. Then I switched to a smaller flat brush and started to form the stem by using the dry brush technique that I learned earlier in the week. I used a dry brush to press and drag across the canvas, allowing the color to fade as the paint ran out. I thought this would give my painting the feathery look I was going for.  I also used the chisel part of the bristle to create the thin lines.

I gradually added more color to the top part of the feather with my Filbert Brush. This helped me create a smooth rounded center. I waited before layering color on the blue center. The last thing I added to the painting was the bright outlines on the rounded top of the feather. I tried to fade the colors into each other, but the colors still look pretty defined.

Here is the progression of my painting.

This slideshow requires JavaScript.

The next thing I want to learn is how to blend and fade colors to achieve a more natural look. I hope I can touch up this painting to make it look more realistic. I am proud of my first start after my new learning, but I know that I have a long way to go before I can call myself a painter.

I started a Pinterest Board for Acrylic Painting Ideas and realized that quite a few frequently pinned paintings belong to the same artist who has a blog of her own.  Another goal in my Network Learning Project is to find blogs/websites of accomplished painters. I would like to reach out to at least one artist and inquire about how he/she got started in painting and ask for advice for a beginning painter. Like Wagner in his article, Personal Learning Networks for Educators: 10 Tips, I think authenticity is critical to learning and collaboration.  I hope that making these connections will other people will broaden my Professional Learning Network and help me to become a better painter.

2 Comments »

A Journey into Acrylic Painting- Post #2

Today I decided to learn more about types of brushes and brush strokes. I started by watching a Youtube video that I found last week, Four Brush Strokes. This was a good jumping off point for me. I watched this video a few times, and practiced each technique that the artist introduced. I learned cross hatching, dry brush, how to create thin lines using a Liner Brush, and how to create an abstract flower using a Filbert Brush.

I really like the Filbert Brush, so I decided to look up more videos to learn other uses for it. I found the video “How to use Filbert Brushes for Decorative Painting.” I learned how to use the Filbert Brush to create more rounded Comma Strokes and how to fill in circular objects. I found that I love the way the Comma Strokes look using the rounder, Filbert Brush as opposed to a flat brush. The Filbert Brush makes the strokes look a bit like peacock feathers…maybe I’ll try a peacock next?

Comma Stroke with Filbert Brush

Comma Stroke with Filbert Brush

Comma Stroke with Flat Brush

Comma Stroke with Flat Brush

After practicing these strokes for a few minutes I felt like I needed more information, and another perspective so I browsed Youtube for a few minutes and stumbled on a video of an art teacher, Melinda Gahn, beginning a class on Acrylic Painting Techniques. I found this video to be helpful because she explains in simple terms the difference between a flat brush and round brush, the three parts of a paint brush (handle, bristle, and ferrule), the two parts of a bristle (flat and chisel) and how to hold your brush. I watched this video several times and paused it A LOT to learn how to paint straight lines with both the flat and chisel parts of the bristle, the Comma Stroke, the C-Stroke, the U-Stroke, and the S-Stroke.

I also learned some tips about how much paint to add to your brush, how to balance your hand with your pinky on the page, and how the art of brush strokes really comes from your shoulder, not your hand or wrist. I realized that I was definitely using my wrists more than my shoulder so that will hopefully help me have more control! I am discovering that using the internet for researching and learning about a topic allows you to broaden your scope of learning. I’m not sure that I would have ventured into learning more about the Filbert Brush had new material not been so accessible.

Here is some of my practice with the new strokes I learned:

This slideshow requires JavaScript.

Check back later to see my first go at painting with these new techniques!

4 Comments »

A Journey into Acrylic Painting- Post #1

I have always wanted to paint. I was inspired to try acrylic painting in college when I took a class called “Creativity.” I bought loads of canvases, acrylic paints, and an easel to inspire me to learn this art form. The inspiration definitely kicked in, but my desire to actually learn technique did not. As a result, I have several canvases covered with “abstract art” (I’m being generous when I use that term). In my early attempts, it is not uncommon to see outlines drawn with Sharpie, bristles from my cheap paintbrushes stuck in my work (to give it “texture”), and simple blocks of color.

volvo bristles

After spending/wasting time and money on supplies, I think it is finally time to learn the technique of painting with acrylics. My husband bought me an instructional book as a gift, but I found it difficult to learn from the narrative structure and photos.

For my network learning project, I will attempt to learn the technique of acrylic painting using multimodal tools. First, I would love to learn about the different paint brushes and their uses. I also need to learn proper brush technique and how to blend colors. Then I will learn how to plan for a painting and learn about size and form. I also need to gain knowledge about layering colors, adding texture, and fixing mistakes.

To get me started on my Network Learning Project I plan to join the Google+ Community Painting Art Acrylics. This resource has over 1,700 members and looks like a great place to see artists’ work and learn about their process. I also plan to watch and study some Youtube videos to help me see artists actually painting. I think viewing the process will be helpful as I learn technique. The videos “Four Brush Stroke Techniques“, “How to Paint with Acrylics : Brush Techniques for Acrylic Painting: Pt. 1“, and “Acrylic Brush Techniques” will help me learn the basics of how to use the brush strokes. The videos Blending and Scumbling – Acrylic Painting Lesson and How To Blend with Acrylics: Refined Blending: Acrylic Painting Technique will help me learn how to blend paint to create new shades of colors.

Hopefully these resources will get me started on my journey into acrylic painting! Check back here for updates on my progress!

2 Comments »